Wednesday, October 29, 2008

Creating an Urban-Style Piece of Artwork in photoshop

Creating an Urban-Style Piece of Artwork

What We're Making

This is the final image we will create:

Preparation

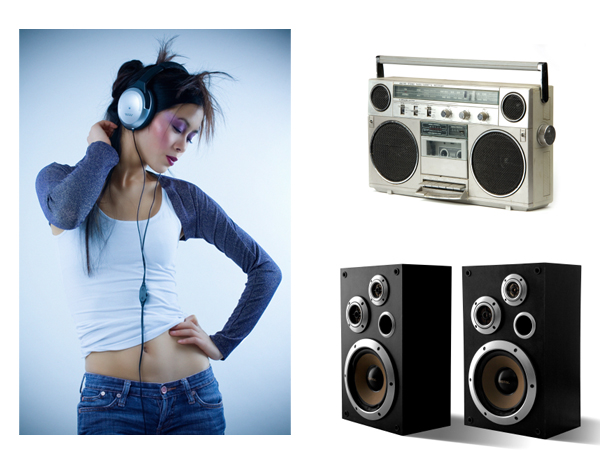
This tutorial is very stock-heavy. Since the basic theme of the image will be "music," I gathered a few stock images from iStockPhoto. I suggest that you also choose a theme and gather a bunch of stock images you think will be useful before you start creating the image. Here are links to the ones I used: Girl, Speakers, Boombox

Step 1

Before we start with the stock, we will quickly create a texture for later use.

So create a new document. I used 800 x 600px for my canvas size. Make sure your foreground color is black and your background color is white. You can simply press D on your keyboard to do that.

Add a new layer and go to Filter > Render > Clouds. Then go to Filter > Noise > Add Noise. Choose the following settings: Amount 50%; Distribution = Uniform; Monochromatic = On. After that, use Filter > Artistic > Dry Brush with settings: Brush Size = 2; Brush Detail = 8; Texture = 1.

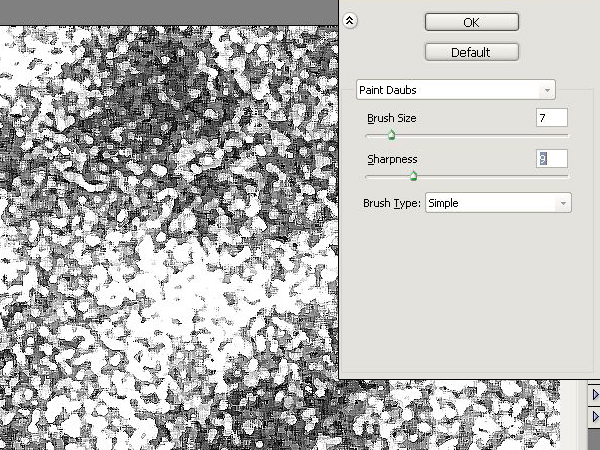
Now again, add some noise by going to Filter > Noise > Add Noise and use the previous settings. Then use Filter > Artistic > Paint Daubs with the settings shown in the screenshot:

Step 2

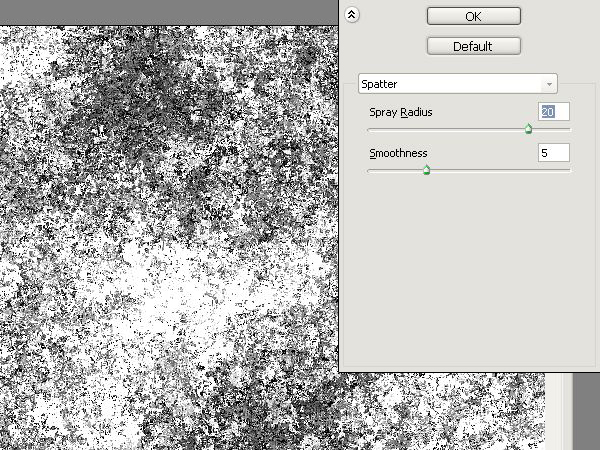
Now use Filter > Brush Strokes > Splatter with Spray Radius = 20 and Smoothness = 5. Your image should look like this:

Step 3

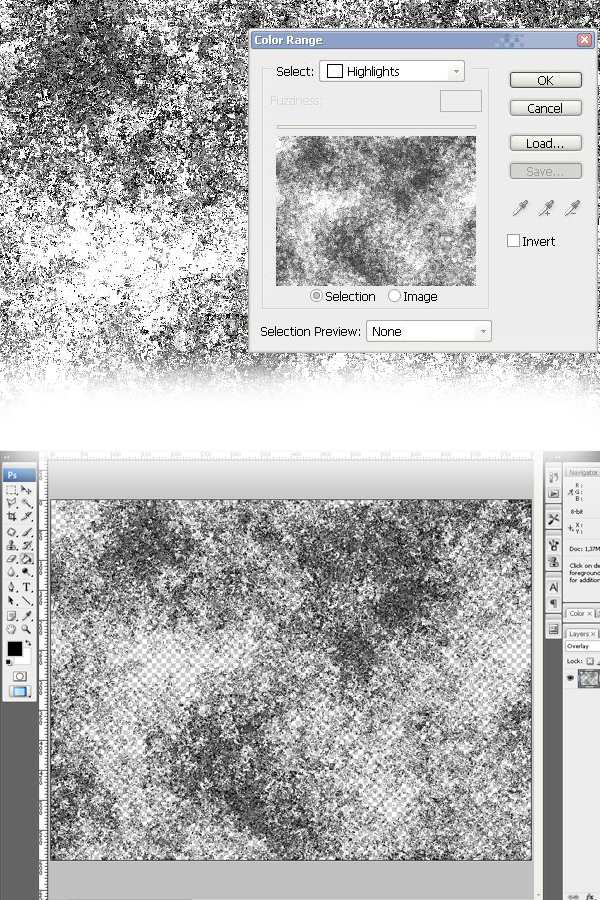
Go to Select > Color Range, choose Highlights, hit OK, and you will see that random areas in your texture are now selected. We will delete them by pressing Delete. Also, delete the background layer and you're done with your texture! Save it, we'll use it later.

Step 4

Now we will just cut out all the images that we will use for our further work and save them.

You can do that by using the Pen Tool (P). If you have a complex shape that you want to select accurately (i.e. hairstrands), then fear not because I will show you a very useful technique in the following steps.

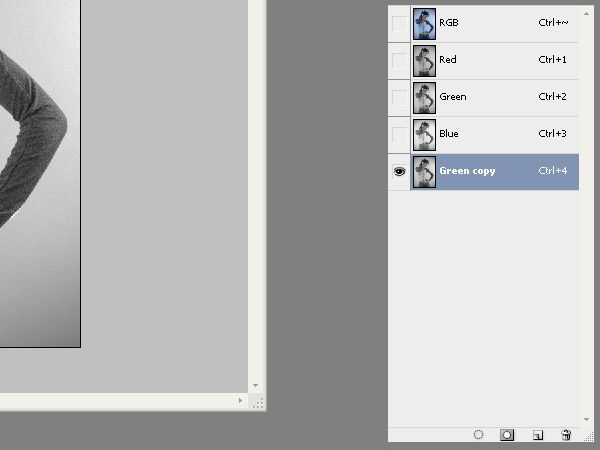
The model in the stock photo I'm using has very fine hair strands. We want to select her body shape while also accurately selecting the fine hair strands. In order to do this, go to the Channels palette and identify the channel with the highest contrast between the model and background. In this case, I chose the green channel and duplicated it. Make sure the channel is selected and not hidden.

Step 5

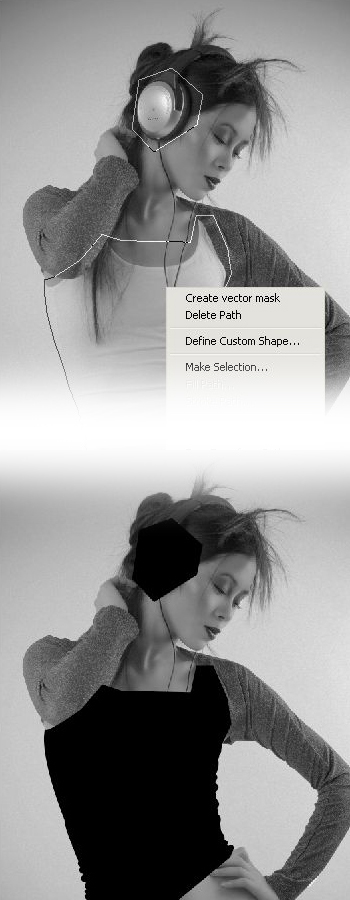
Our goal is to make a selection of the model. The model should be solid black and the background as white as possible. With that in mind, we need to paint the headphones and the model's top solid black, as they are too bright. So trace around those parts and fill the selection with solid black.

Step 6

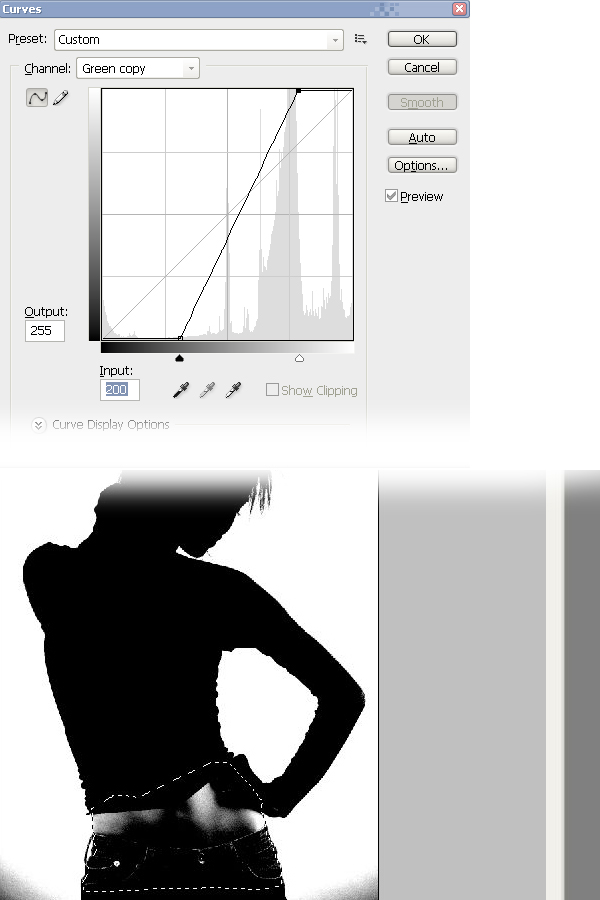
Press Ctrl+M to open up the curves window and drag the two controllers further together to raise the contrast between model and background. You might need to repeat this a few times. In the end there may still be some bright parts. Quickly trace around them and fill them with black.

Step 7

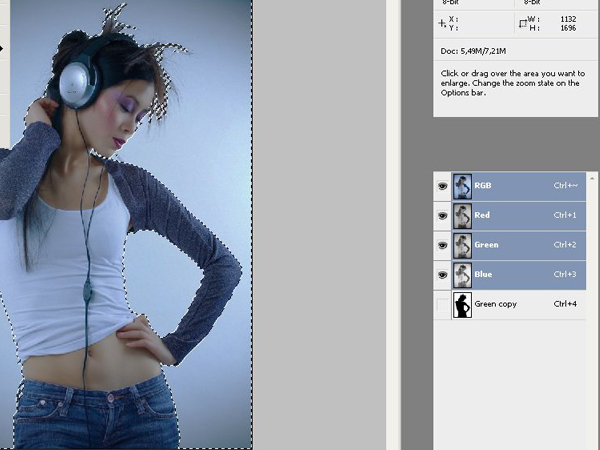
If you're satisfied with the result, Ctrl-click the channel to make a selection. Press Shift+Ctrl+I to invert the selection or go to Select > Invert. Now click on the RGB channel and copy+paste the selection into a new 800x600px file. Voila! You have selected the model with all the fine hairstrands.

Step 8

We want to give the model a distressed look. Desaturate the model (Shift+Ctrl+U) and duplicate the layer. Set the duplicated layer to Multiply and make sure it's on top. Select this layer, open up the curves window again (Ctrl+M), and raise the contrast until you like the result.

Step 9

Desaturate the other images, add them to the model, and make a nice composition.
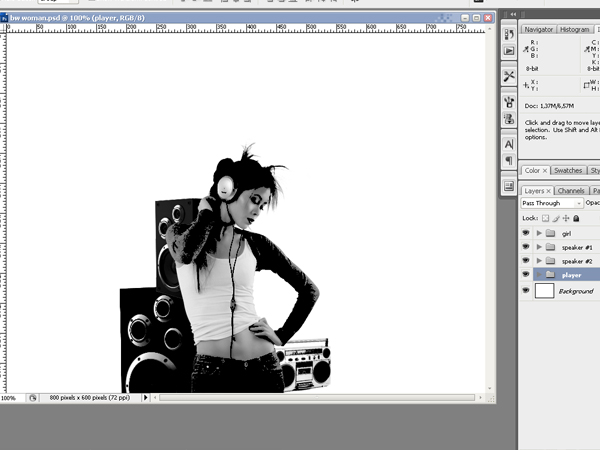
Step 10

For the next step, we will use some damaged paper as a texture. Just scan some crinkled paper or try to make a picture with your camera. You can download my paper texture here.
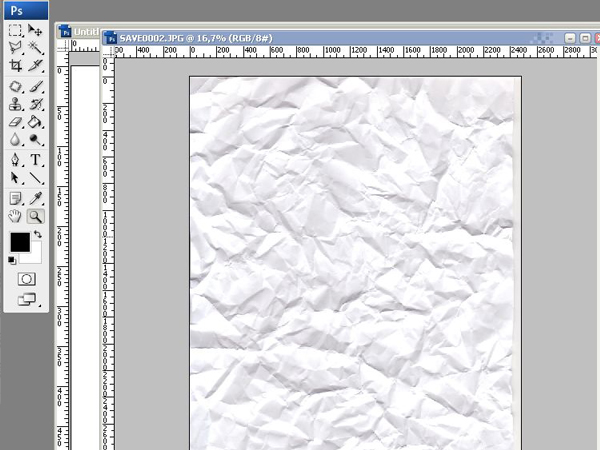
Step 11

Paste the texture above our image and set the layer style to Multiply. If necessary you should also desaturate it and raise the contrast a bit. Flatten the image and make a rough selection of the objects, like below:
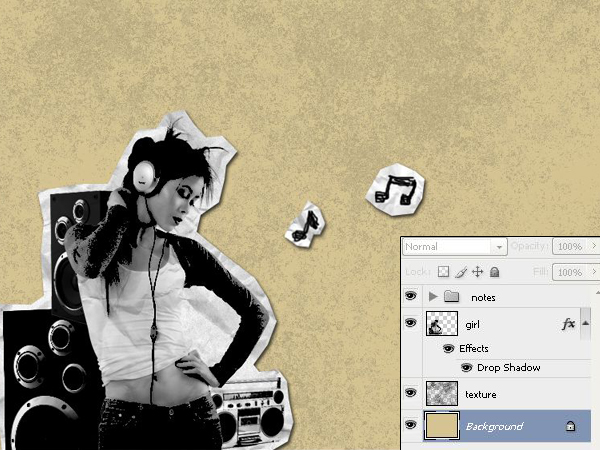
Step 12

Paste the selection into a new file and add the texture we made in the beginning. Set the Opacity of the texture to 15% so it's more of a background effect.

Fill the background layer of the new file with a color of your choice to give the image more life by making the paper cutouts really contrast out from the background. I also added some notes that I quickly scribbled by using a small, round brush and then followed the same paper texture technique.

Don't forget to add drop shadows to your objects. This way they will look like they were cut out of paper and pasted on top.

Step 13

Next I've added some halftone effects and swirl brushes as well as some splatter brushes. If you don't know how to make halftone effects, check out Sean's Halftone Tutorial. For swirl/splatter brushes go to DeviantART or Brusheezy.com. Besides that, I added an image of a cityscape. You can find some great scapes for free at Sxc.hu. When you find an appropriate image, desaturate the cityscape, boost up the contrast and set it to multiply to get the effect in the final image below.

Conclusion

I am sure that the textures you created and used during this tutorial will be very useful for some of your following projects. I also believe that the new technique I showed you to extract complex shapes will also help you in your further work. You might have realized that we didn't necessarily need to cut out the hair so exactly, since we pasted the model to a plain white canvas. However, I thought this would be a great opportunity for me to show you this technique :-)

Creating Flaming Text with Photoshop

Creating Flaming Text with Photoshop

Step 1

Create a new document, 600×360 pixels (72 DPI).

Step 2

Set background layer to black (#000).

Step 3

Create text element using the word “Diablo”. I used AvQuest font at 94px. Of course you can use whatever font you would like.

Step 3

Step 4

Make a new layer above the “Diablo” layer by clicking on the create new layer icon. Set layer name to “Fire”. Merge all viewed layers to the “Fire” layer with Cmd + Option + Shift + E for Mac or Ctrl + Alt + Shift + E for PC.

Go to Edit > Transform > Rotate 90 degrees CCW

Step 5

With “Fire” layer active go to Filter > Stylize > Wind. Leave the dialog set to defaults and click OK. Repeat this filtration one or two more times (Use Cmd + F or Ctrl + F to repeat).

Now go to Edit > Transform > Rotate 90 CW

Step 5

Step 6

The wind filter is a bit to harsh, so we need to blur the effect a bit. With “Fire” layer active go to Filter > Blur > Gaussian Blur. Set Radius 1.5 pixels and click OK.

Step 6a

Now for the cool part. Lets add some color :). Go to Image > Adjust > Hue/Saturation. Make sure Colorize is checked off, set Hue to 40, Saturation to 100 and click OK.

Step 6b

Step 7

Duplicate “Fire” layer by dragging it to the create new layer icon or with Cmd + J or Ctrl + J to create “Fire copy”.

With “Fire copy” active g to Image > Adjust > Hue/Saturation or Cmd + U or Ctrl + U. Set the Hue to -40 and click OK.

Step 7a

Set mode of “Fire copy” layer to the Mode Color Dodge and then merge the layer down onto “Fire” layer by going to Layer > Merge Down

Step 7b

Step 8

Now comes the tricky part. We will use Liquify filter to make the flames more realistic. This step will take some practice, so try to be as patient as possible.

With “Fire” layer active, use the following keyboard shortcut, Cmd + Shift + X (MAC) or Ctrl + Shift + X (PC), this will bring up the Liquify filter.

The Warp tool is selected by default. In the dialog box set the Brush Size to 50 and the Brush Pressure to 40. Now click-drag the initial flame shapes up from the edges of the white text areas. Wiggle the mouse as you drag up. This first run creates the major flame shapes.

For the second run, create smaller flames by reducing the Brush Size to 30 and the Brush Pressure to 35. Now you will need work each flame until you start seeing my results. This will require you to change brush sizes and really get in and work each flame. It will take some time and practice, but you can do it!

If you want to start over you can Reset back to the undistorted version by holding down Option for Mac or Alt for PC and clicking the Reset button that appears to replace the Cancel button. You can also use the Reconstruct tool to remove or rework your distortions. Once your happy with the results, click OK.

Step 8a

Step 9

Move the original “Diablo” text layer to the top of the layers.

Set to color of the text to black (#000)

Step 9a

You can choose to stop here if you want the original Diablo logo. Our next objective is to make the text look like it is all on fire and has been burning for a bit.

I want to give the appearance of cracks in the lettering, so we first need to raster the “Diablo” text layer. Zoom in a bit, select the Magic Lasso tool, and start making small random cuts into each letter. Examples below show start to finish cracks.

Step 9b

Step 9c

The black lettering is to dull, so we need to add some more color and texture. First, add a drop shadow to the “Diablo” layer. The Blend Mode for the shadow should be set to Multiply and the color to #b75c0b.

Step 9d

Add an Inner Bevel to the “Diablo” layer with a Highlight color of black (#000) and shadow #844600. Make sure to duplicate the settings below and then tweak from there.

Step 9e

Finally, add a Color Overlay with #f57300. This will give the illusion of the text blending in with the fire.

Step 9f

Step 9g

Step 10

Duplicate the “Fire” layer once again and place the layer “Fire copy” at the top of the layers.

Set the mode for “Fire copy” to Screen with Option + Shift + S. Then add a layer mask by clicking on the Add Layer Mask icon at the bottom of the Layers palette.

With the linear Gradient tool run a white to black, linear gradient from the top of the text area to the bottom.

Then use the Smudge tool or Shift to toggle, with a 65 pixel, soft edged brush at 70%, on the layer mask, dragging up and down to reveal or hide flames. I also used to the eraser tool on “Fire copy” layer because I felt the top of the flames were a bit too bright.

Step 10

Phewwww, now we’re done :) Below is my finished product…

Step 3

Hope you enjoyed the tutorial. We look forward to hearing from you about any suggestions or comments about the site. If you have any suggestions for tutorials, please feel free to submit them using the form on the right column.

Monday, January 14, 2008

Photo Manupulation - Photo Shop

1. Here's some simple technique's to adjust or manipulate elements of color within a given photo.Tools used will be some adjustment layers and the extract tool, so follow along and have fun. Below is the original picture:


2. To start things off I'll manipulate the color of the eye.So, set the foreground color to one of your choice. I used #FD6E13.Then, select the 'Elliptical Marquee Tool (M)' from the 'Toolbar', Ctrl + Plus key to zoom in, and draw a selection around the eye as I have captured.


3. Next go to 'Layer'New Adjustment Layer/ Hue/Saturation'. And on the next screen, check the 'Group with Previous Layer' option. (As I have captured below)


4. Next, your in the 'Hue/Saturation' control panel.Select the 'Reds' from the 'Edit' list, and alter the sliders as I have captured below. ( Ultimately, the amount of adjustments is up to you.)


5. This is what your image should look like, and below is a capture of the 'Layer's Palette' thus far.As you can see the 'Hue/Saturation' layer is grouped above the original. No affects or damage done directly to the original.


6. Next, lets clean up the excessive areas, by selecting the new 'Hue Saturation' layer, set the foreground color to 'Black' (D key), then select the 'Brush Tool (B)' and paint the excessive areas away.TIP:Adjustment Layers include 'Layer Masks', so by setting the foreground to 'Black' and painting over areas 'hides', using 'White' foreground 'reveals'.You can also reduce the 'Opacity' of the 'Hue/Sat' layer to soften the affect. Below is my cleaned up area followed by the progress, thus far.


"THE SAME WAY YOU CAN DO AND CHANGE THE COLOR OF THE LIPS & HAIR"

TIPS: Using pen tool you can trace..........


Finally........................Hope you like it!!!!